Showing posts with label photography. Show all posts

Monday 31 March 2014

Return of the Toy Photographer...

Strange Trophy
It's been a while since I last posted anything, hasn't it?

I'm pleased to report that everything is going well here at the Collection HQ, but I've been insanely busy finishing off my uni course over the last few weeks and haven't had much time to do anything beyond filming, editing and writing essays. And yes, that includes eating and sleeping! With all of my big deadlines finally out of the way however I thought I'd unwind today with a bike ride and a spot of action figure photography...

Somewhere along the line, Teebo from POTJ has become one of my favourite figures to photograph, and today was no exception - I wasn't even planning to go anywhere that wooded, but still bought him along just in case and was rewarded when I found a very cool spot along an abandoned railway track. 

I tried something a bit different today and left my Canon 600D at home and instead took out my old PowerShot A530, a point and shoot I was using way back when I first got into this hobby. I found I was focusing a lot more on composition of the shots than anything else, and whilst the auto focus led to a lot of blurry takes I was able to get a reasonable amount of usable pics. It was a lot of fun and a lot easier than carrying around my bigger camera, so I might be using it a little bit more in the future...

*
This old chestnut...

On another note, the Emcat and I are moving house! We're downsizing to start saving for the future, which means we're doing a lot of sorting and clearing out. Toys will be sold amongst the shedding, but at the end of it I'm going to have the kind of streamlined, focused collection I've been after for a while now - as well as also having the space and funds to add to that collection further down the line. Whilst all this is going on there'll probably be another absence of posts, but hopefully for nowhere near as long as this last hiatus - more than anything, I'm looking forward to finding a whole host of new locations to explore and share...

Man, it's good to be back. To those of you still out there, many thanks for reading!

Tuesday 3 December 2013

Photoshop Prime

TFP Bumblebee
Over at TFW2005.com I found a Photoshop tutorial by Cheebs (presumably not his real name) - you can see it for yourself here. Given I had a bit of time to kill today I thought I'd give it a go, and the pic above is the result.

It didn't take ages, I maybe spent an hour and a half in total on the edit, but this level of touching up makes a huge difference to the quality of the finished shot, to the extent that I've been happy to put my name on this one (definitely not my real name). It's also good to think that I'm starting to get decent use from my light box; it's about time I learned how to use it properly...

Wednesday 20 November 2013

Blogging and Photoshop

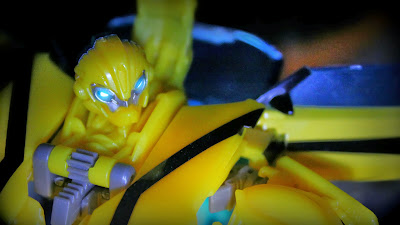
TF: Prime Deluxe Bumblebee
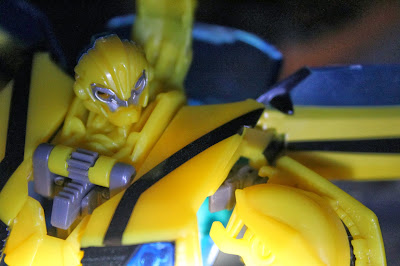
Since starting this blog I've been evolving the way I use my collection - from initially wanting to document each figure as I purchased it (on my way to building a Jabba's Palace display), to then wanting to focus on diorama building; however I've since found that the one constant has been actually photographing the toys, and creating images that attempt to show these characters at their best. The shot of Bumblebee above is my most recent, and I'd like to share some of the techniques I used to create it...

Firstly, the kit - I shoot on a Canon 600D DSLR, usually using the 18-55mm 'kit' lens, but sometimes a 50mm (although this generally only works for larger objects). This is my equipment for my day job as a filmmaker though, and something that I've worked up to. My initial forays into toy photography were on a Canon Powershot, and photographers such as R2witco take a lot of their stuff on camera phones. Basically, as long as you've got a macro function (often displayed as a flower on the camera settings) and can find a way to set the focus where you need it, then your camera is suitable for the job.
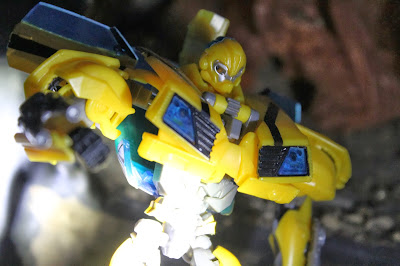
One of Many
This shot was an unused take from the session which yielded the final image. Here it shows more clearly the background, which is the old fireplace in my study. Whilst barely recognisable as anything, the important thing for an action figure shot is that it doesn't look like a house. Nothing kills the 'reality' of a Dinobot shot more than Grimlock being out scaled by a potted plant. What the above shot also shows is the lighting setup I was employing - basically, one torch. There was a little bit of light from the window (it was dusk), but that torch was my primary light source. I wouldn't encourage shining the light directly onto your subject like that, but I knew I would be cropping the image anyway (more on that later).

I'm often lazy with lighting, either taking the figures outside or shooting around the office window (nothing beats indirect sunlight as a light source), but taking the time to create a proper lighting setup often works wonders - see my PAK Batman shots here. I think it's to do with cast shadows, which helps to integrate the figure into the environment and in turn create a sense of reality. It's something I'm going to work on, especially as winter descends and daylight becomes scarce.
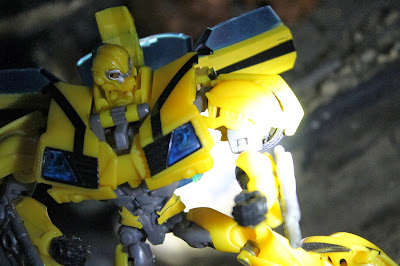
And Another...
What I consider the most important point of action figure photography is to GET LOADS OF SHOTS. Whenever you have a setup, go trigger happy - I'm gonna presume that you're shooting on digital so the cost of film isn't an issue. I find that it takes me a little while to get 'warmed up' to a subject, and really get an idea of what works. Mess around with your angles, the pose of your figure(s) and experiment with what you want to focus on - and even after you think you've got the shot that you're after, get a couple more. You may surprise yourself. The other thing to remember is that cropping is your friend - you might be gutted that the stand for your figure is just visible in the frame, but with a crop and a re-composition it could still be the perfect photo.

The 'One'.
When I had the shot of 'Bee that I was after, the fun part started. Firstly I opened the image in Photoshop (Paint.net is a superb free alternative if you don't have access to this), and then I did a quick Google search and found this rather superb guide to creating eye FX on the TFW2005 forums. Thank you, Process - if that is your real name...

After the eyes were completed I imported the image into Picmonkey, my editing suite of choice. Here I cropped the image to a 1920x1080 resolution (my usual canvas size), and then played around with the exposure, saturation and sharpness settings to get a base image I was happy with. Using these tools really does require trial and error, as well as a degree of personal preference, but it's at this stage that the image really starts to come alive. I should also note that you can use the colour settings on Picmonkey to fix the white balance, which is always useful - simply use the neutral picker and select the part of the image that should be as close to pure white or black as possible, and it will shift the colour tones accordingly. Again this takes practise, but when you get the hang of it it's a valuable tool. 
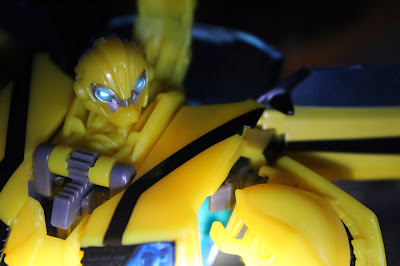
The Glow!
When I was happy with the core picture I used some of Picmonkey's various filters to complete the image, as seen at the top of this post. Once more this comes down to experimentation and personal preference as to how you want your image to look, but there are some pretty cool filter options on there. Really editing is all about how you want the image to look, and finding ways of making it happen. I've been doing this for a few years now and I still haven't found one particular style that I've made my own (look at Ed Speir IV's work for examples of instantly recognisable photos), but I'm definitely developing my skills, and I think that a style will come with that eventually.

There it is then, a few of the tips that I've picked up when it comes to action figure photography. I hope you find them useful... Now go and take some shots!

Tuesday 22 October 2013

Photoshop

Gold and Blue Team.
Whilst perusing some toy photography shots on the web, I came across this photo of Bane from El Dave Photography. Reading through the description I decided to mess around with layers in Photoshop with one of my own lightbox images to see what I could come up with...

The Original Image
Firstly I duplicated the image twice, each time into a new layer. I made the top layer blue and reduced the opacity until it simply created a pale blue tint over the image. With the next duplicated layer down I increased the contrast and the brightness, which really helped clarify the details.

Post-Photoshop
Then I pulled the photo into PicMonkey and got to work. After cropping the image I put a gentle vignette over it, which helped to soften the corners, and then used the Orton filter to give it a slight glow. The finished image is a bit too soft for my preference, the compsition's not fantastic and the reflection of my hand in C-3PO's shiny frame is a bit too blatant to ignore; but all the same I'm impressed with the results of ten minutes experimentation.

As an aside, this was the kind of vibe I was going for with the original photo. Probably.

"My joints are freezing up!"
It was in my ESB folder anyway, so I'm guessing this is what I was thinking...

Thanks for reading!

Monday 7 October 2013

Back to the Fold

The Best at 6"
I've been pretty slack here for various reasons over the last month or so, the better of those reasons being that I've just started the third year of my university course. Whilst that is (rightly) going to take up a lot of my focus, worry not about my Star Wars fan status - my dissertation is going to be on George Lucas himself, and the many, many contradictions that he presents. If I don't end up hating every word I've jotted down by the deadline, I may even post it up here for your perusal...

Looking for Someone...
My apologies if you came back here expecting Black Series 6" reviews - whilst I have three out of four of the first wave, I've not gotten around to objectively collecting my thoughts on them yet. From my limited 'playtime' I would suggest that the Sandtrooper is the best of the bunch, but it's difficult for me to judge, with X-Wing Pilot Luke Skywalker being one of my favourite versions of the character in any action figure line anyway; even the times when he's actually a Snowspeeder Pilot!

Lightsaber Duel? I Maul For It!
Other than these guys I have no recent purchases to highlight, vintage or otherwise, which should allow me the opportunity to catch up with some of my backlog a little bit. University deadlines or not, I'm sincerely hoping to give you many more reasons to return for the next couple of weeks at least...

Thanks for sticking around!

Thursday 1 August 2013

On Location

Leo going solo.
I re-arranged my Flickr sets today, and as I pored over the photographs from the last three years I was struck by how bad some of my initial efforts were. Unfortunately, some of the more recent ones stuck out as well, and it struck me that my biggest issues are lighting and setting, two of the three key components of a photograph (the third being the subject). I thought I'd pay a little attention to this for today's post...

Leader in blue!
It's unfortunate that I don't have room to store different sets, much less the time to build them nowadays, and a cluttered house doesn't really cut it as a backdrop when photographing 1:18 scale figures. Fortunately though, as fantastical as Star Wars is, if you live near a swamp, woodland, desert or beach, or even some destitute scrub land, you've got the ideal setting for your action figure photographs. Although living in the middle of the UK isn't ideal for a desert or beach, it more than does the job when looking at Dagobah or Endor...

BTS: The glory of cropping!
But what about the urban heroes? Northampton really isn't much of a cityscape, the lift tower being the sole defining feature of the skyline, and if I struggle with building a set for something fictional, I think I'd really mess up a scale recreation of an NYC rooftop. So how best to photograph them? Why, multistory car parks, of course!

Miles Morales...
I frequently try and find a lighting set-up that works best for me at home, in the lightbox or otherwise, but hands down using natural light is the best. The colour balance looks right, and if you pick a  good spot (somewhere open but out of direct sunlight) the lighting is crisp and even across the subject. Occasionally you may need to use a reflector to get the light to go exactly where you need it, but you should be fine without. Also, the more light that is available, the less your camera has to compensate by auto-filling information. This is what happens when dark pictures appear grainy; there's not enough information for the camera to create a whole picture, so it fills in the gaps itself. It's always better to shoot light and darken the image in post, if needs be.

...the Ultimate Spider-Man!
A car park fits the bill of being somewhere open but out of direct sunlight, and provides a gritty and urban setting for our more 'street' figures, with a view across the rooftops to boot. Furthermore during the day the higher-up levels of the car park are rarely used, providing all the privacy a grown man playing with toys in public needs!

Ninja Protector!
It's not perfectly to scale, but the car park fits the bill well enough, and it's nice to finally have somewhere to play with capture my superhero figures at work. What's even better is that I'm finally starting to get the quality of photograph that I've been after since I started. Onwards and upwards, I suppose...

Good luck with your own on location shooting, and thanks for reading!

Saturday 11 May 2013

Play Arts Kai Dark Knight Trilogy Batman

More than just a Man
Hello, world of high(er) end collectables! If you're as good as my first impressions of the PAK DKR Batman here, I may just stick around...

This is that pre-order I was talking about, and it's pretty incredible. This figure's got fantastic poseability, comes with a great selection of accessories and feels pretty sturdy - I haven't experienced any QC issues as yet (and I'm knocking on wood as I type) - it's without doubt the best Batman I own. Hoping I can get some good pictures with this guy, and maybe one day a Joker to go with him... Everything but my wallet is stoked for this!

Tuesday 7 May 2013

Red Hot Summer

Decepticon Smolder
Quick photo post! We cleared out the garden today, and then had a little burn out with the cuttings. This seemed like the ideal situation to showcase my number one pyromaniac Decepticon, Smolder, as always accompanied by his Targetmaster-esque fire axe Chopster.

Through some of the exceptional photographers at Flickr I found PicMonkey, a photo-editing site that works like a phone app but with more functionality. There are premium only tools, but I edited the picture above with the free filters and I'm very happy with it how it turned out. There's not even any need to sign up and log-in, and you can upload straight to other sites, as well as save to your computer. I have yet to see a downside!

Eyes on Fire!
Back on topic with Smolder - you may remember that I pre-ordered the Maketoys Mobine Missile Launcher back in December; unfortunately after several delays (it's still on pre-order for April, with no sign of updates...), I cancelled the order to utilise the finds for something else. I've instead made another pre-order, but this time I'll keep quiet on what it is until I have it in hand...

Saturday 26 January 2013

Outside the Rules

I've been working on some shot ideas for the The Rather Childish 2nd Annual Vintage Star Wars Action Figure Photo Contest (closes January 31st, there's still time!), and took the opportunity to use my lighting and set-up with a slightly newer guy...


Man, I do so much better with the modern figures. On another note, it's irregular games night tonight! X-Wing vs TIE until the small hours... :D

Sunday 13 January 2013

Worlds Collide

Home Phone?
My girlfriend and I went out to a vintage fair yesterday, scouting out any suitable objects/items of clothing for an upcoming film project. It was a bust for that, but I did pick up this homesick guy for only £1. 

E.T. is a film that gets me every time, and my appreciation for it grows greater as I get further into the world of film-making myself. Whilst Lucas clearly rules the roost in terms of my love of merchandise, it's nice to let another great film take the spotlight every now and again...

Wednesday 9 January 2013

Vader Unleashed


Another drive-by posting, but whilst I'm still insanely busy with Uni work I haven't got as much time as I'd like for toy photography. However, I do want to show off this Darth Vader shot, taken on the same trip as my latest Boba Fett photos.

I was going for a Force Unleashed prologue vibe, but the picture's cropped so close it's open to interpretation anyway. I really enjoying editing Vader shots, because of the challenge of getting the lighting right while maintaining the detail, darkening the cloak (which is incredibly porous), and putting FX on the lightsaber and the armour. These tweaks really enhance the picture I think. These type of shots are inspired by (and certainly inferior to) the work of resistance827 on Flickr. Check it out!

Tuesday 11 December 2012

ME GRIMLOCK KING!

ME GRIMLOCK NO BOZO!
After a couple of weeks of letting my QC standards slip I've been making a conscious effort to step back from the editing software a little, and to try and get a decent picture first time around. Nothing's exemplified this better than these recent Grimlock shots, and I'm really happy with how this set's turned out.

Nom.
Well, I say "step back from the editing software", but I've still made minor modifications to the image; however, I've kept the emphasis on minor and only slightly tweaked the brightness, shadows and contrast, and not used any photo-apps. I think my reliance on apps and preset treatments led me to believe every image requires loads of post-production, and after some bad photos I remembered that that's not that case.

Akin to my post on copying promo images, the above shot is a Transformers Animated take on the below G1 image; Grimlock getting chompy on Thrust. I always preferred the Seekers over the Coneheads, subsequently the jet getting chowed down on above is none over than Starscream.

G1 nom.
And a wide shot to round it off. I've been properly enjoying playing with this toy and the character, and it's showing in the final product. It seems like my interest in Transformers is really fuelling my creativity; and you gotta go where the river flows, I guess...

ME GRIMLOCK KING!
So there we have it; how to get your toy photography mojo back with Transformers Animated Grimlock. Thanks for reading!

Friday 9 November 2012

Watching Them Escape


I'm thoroughly enjoying the Blu-Ray ESB figure pack, and today can introduce the Snowtrooper to the Blog. I still have to take some shots of the Princess Leia, which is an excellent looking figure, but will get around to that when I'm feeling a bit more wintery. I think building a suitable set for her could take some time as well...

I went a slightly different way to usual with this shot, as it was a black and white image that I've edited a fair amount. As always, Vader's cloak needed some touching up to look heavier, and I added the lights to his chest plate. Otherwise the blue tint was achieved by lowering the colour temperature and increasing the saturation. I think it's worked out alright; for sure it's made Vader's armour look great!

Wednesday 7 November 2012

Running into Trouble...


I posted this on my Flickr photostream, but the colour temperature was much colder, so I fixed it for here. Not sure which version I prefer now... :S

Film-making is taking over my life currently, which is probably why this photo has such a cinematic treatment. I'll update when I can!

Monday 29 October 2012

Point of Comparisons

Probably the best Star Wars shots I get are the ones that I directly base on stills from the films, and the best place to go for these are production or promo stills, because they might show a slightly different angle to what we're used to seeing. This is interesting in itself, but also because when you're not enslaving yourself to exact screen accuracy, you can roll with the picture a little bit more. Case in point...


I wanted to get some shots of my new Boba Fett figure in action, and I've also wanted to do something Bespin related for a while - an easy two birds with one stone. After a quick Google and a shifty through several images, I settled for this one:


Hardly accurate, I'm sure you'll agree. But the point is, I got my inspiration for the shoot; and after trying several unsuccessful times this morning to get decent pictures of Boba in the bag, it's nice to finally get him up here!

Anyway, there'll be more pictures and a review of Boba Fett and the rest of the ESB Blu Ray pack up soon, before I crack into ROTJ. Exciting times!

Wednesday 12 September 2012

Vader and the 501st


No Vintage Wednesday today, but I have more planned for next week. Instead my Star Wars run continues, with this 'inbetween the trilogies' shot of Vader and a Clone Trooper on the Jedi hunt. I think that's a pretty exciting time in Star Wars lore, and it's a shame that the planned live-action show is looking increasingly unlikely.

This shot took a fair bit more editing than most, and not just for the lightsaber. Vader's cloak, being quite a light material, let loads of background light through (you could actually see the trooper through the cloak under Vader's left arm), and so it required a little bit of work; I used the light and contrast settings along with gaussian blur, and even a little bit of paintbrush to get it as dark as it is now. This is only my second attempt at creating a lightsaber glow, and it's definitely better than my first; however, I think I made the white core a little too big here. I'll just have to practice a bit more... :D

Saturday 8 September 2012

Luxury of Choice


I had a spare hour yesterday and knew I wanted to get some SW shots, although I had no idea of what. When I saw these guys on my shelf, everything kinda fell into place...


So, Star Wars. It had been a while. As much as I've enjoyed the Transformers shots recently, I've not taken any that I've been really happy with, and my interest has started to wander from the Robots in Disguise. Only for the time being, I should hasten to add - I'll be a lifelong fan, but a recent interest in Indiana Jones saw me drawing back into the world of Lucasfilm; really, this was inevitable!


I was messing around with some different lighting for these shots, experimenting with shadows and composition, but when I started to touch up the images this morning it was the more broadly lit pictures that I preferred, which surprised me. I think I'm starting to get the hang of editing shots, but as my last TF batch showed, maintaining consistency is hard. The main thing I've realised over the last few days is that I keep repeating mistakes, which I think comes from trying to rush and do shoots on the fly - basically, not being committed enough. What really helped me with this shoot was that I devoted some time to it, and got lots and lots of pictures, and tried different things as well. When I looked through the shots this morning I was surprised by which ones I preferred, but then, I gave myself that luxury of choice.

Tuesday 4 September 2012

Autobots & Backdrops

RTS Special Ops Jazz
This is photography 101 right here - last week I finally got around to spending the 35p needed to buy a sheet of black sugar paper to use as a backdrop for action figure shots, and then today I finally got the time to snap a couple of pictures...

Autobots!
The shots above were naturally lit from the window opposite. I got pretty even lighting but I could have used a reflector to bounce some light on to the backsides of the figures. Following the shoot, I made crops and adjusted the colour in Windows 7 picture manager before exporting the images to my phone, and then used the photo manager app to finish them off. I only recently started doing this kind of dual-processing, and that's mainly with Transformers shots; firstly because they're so colourful and bold that they make great subjects, and secondly because I really am figuring this all out as I go!

I tried a set up this evening after dark and using a couple of lamps, but couldn't get any results I was happy with. Regardless, I found a particular line-up of Autobots I like...

Dark Autobots!
The amount of colour correction required on this image really washes the colour out, but I've yet to find a way to manually adjust the white balance on my camera outside of a couple of presets. For that reason, until I get a better lamp set-up and more lighting skills, I'll be sticking to daylight shots!

Reasonably well-adjusted Autobots!
In general I'm happy with the results though. A neutral background such as this really brings the figures to the fore, and I can see myself going this route for reviews in the future.

You may like...

Related Posts Plugin for WordPress, Blogger...